-
 Streams
-
Compute
- Overview
- Group By Ranges & Buckets
- Data Explorer Guide
- Video Completion Funnel
- Saved Queries
- Compute Pricing Guide
- Custom Ad Performance
- Session Timing Metrics
- Cohort Analysis
- Retention Analysis
- Funnel Analysis
- Creating a Funnel with an OR Condition
- Stripe Revenue Queries
- Create a Email Nightly Report
- Query Tuning
- Cached Queries
- Cached Datasets
- Paid Session Metrics
- User Engagement
-
Visualize
Data Modeling Tips & Best Practices
A well-designed data model makes your analytics more powerful, performant, and accessible. This 200-level Data Modeling Guide helps you avoid common beginner mistakes and save time. If you haven’t seen it yet, check out the 100-level Data Modeling Guide too.
This guide will cover:
- Test Your Analytics Implementation
- Including Common Index Names (e.g. day_of_week)
- Data Type Mismatch
- Deletes
- Avoiding Variable Event Collection Names
- Importance of Client-Side Unique Event IDs
- Preventing duplicates using Uniqueness Token
- Trapping Your Data: Lists
- Tips for Modeling Events with Multiple Items (e.g. Shopping Cart)
- Tips for Setting Up Attribution Timeframes
- Next Steps
We’d love to get your advice on what could make our product and this documentation simpler or more powerful. Please, please, please share your feedback with us. We’d love to hear from you.
Test Your Analytics Implementation
Just as you would test any other feature you create and deploy, test your analytics implementation.
A test should include assessing whether the full data volume expected was received, and if that data is accurate. Also consider whether your data is structured in such as way that will allow you to get a key metric. Make a few queries to understand how it would work.
We also recommend creating a seperate project for testing your implementation. We write more about this in the Projects section in the Intro to Event Data guide.
Include Common Index Names (e.g. day_of_week)
If you’re interested in doing analysis by day of week, or any other index, querying your data becomes easier if you send the identifier with the event. The alternative is manually parsing timestamps, which can be a little painful at times.
There are two ways you can achieve this. You can use the Datetime Enrichment or you can manually add index names to your event as seen in the example below.
If you’re interested in doing analysis by day_of_week, month_of_year or even hour_of_day:
  {
    "hour_of_day": 14,   // 2pm
    "day_of_week": 0,    // Sunday
    "month_of_year": 12  // December
  }
This would let you count “pageviews” for your blog, grouped by day of the week, over a given timeframe, to help pick the best day or time to publish your next post.
Why use numbers instead of strings? This makes sorting query results easier. These values can then be substituted in the query response with whichever display-friendly string values you prefer (Eg: “Jan” vs. “January”).
This same philosophy should also be applied with any particular organizational metric you would want to group by, such as cohort.
Check for Data Type Mismatch
This is the most common mistake. Make sure your data is in the right format. If you have a property such as “number of items” and you pass the value as “4”, you will not be able to add the values to determine a “total number of items” because it is a string.
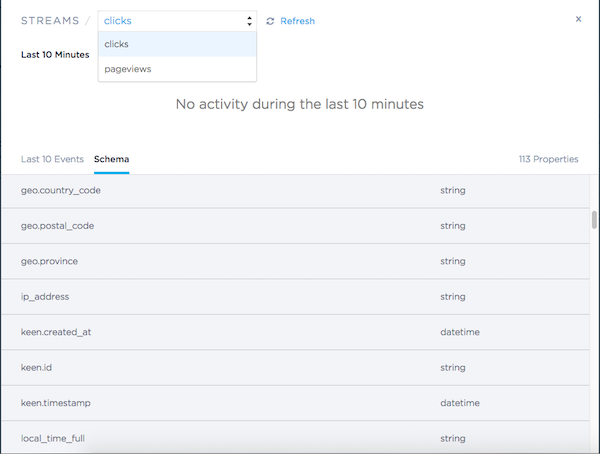
Tip: From the Keen UI in the “Streams” tab in your project, you can view your “Event Streams” (pictured below) and inspect the event properties you’ve collected. Do a quality check to ensure the object has the data type you expect.
Avoid Using Deletes Systematically
Keen allows for deletion of individual events, however they should be used in one-off cases rather than in regular use. In best practice, it is not recommended to build any workflow that relies on individual deletes. Backtracking through your data is inefficient.
Examples where deletes should be used:
- one-off events
- corrupted events
- unexpected bad data
- removing sandbox data from production
No Variable Event Collection Names!
Best practice deems that collection names and property names should be pre-defined and static. Dynamic names are a no-no. Here’s an example of what we mean:
Say you are a SaaS company that has many subscribers. You want to track each time your customers publish new content on your site. Here are a couple of different ways you could model this:
Method 1 [WRONG]: One “post” event collection per customer. E.g. collection name = “Posts - Customer 2349283”.
    post = {
      "post": {
        "id": "19SJC039",
        "name": "All that Glitters in this World"
      }
    }
    // Don't do this!
    // Add your event to the "Posts - Customer 2349283" collection. // EW WRONG NO NO
    // keen.addEvent("Posts - Customer 2349283", post) // EW WRONG NO NO NO
Pros:
- The only benefit to this method is that you achieve very fast performance by breaking all of your events into small collections. However, it’s generally NOT worth it given the cons. The best implementations of Keen use server-side caching for their customer-facing metrics anyway, so slightly longer query time isn’t a problem.
Cons:
- You will have no way to do analysis across all of your customers. E.g. “count the number of posts the last 7 days”. You would have to run X counts where X is your number of customers, then add them all up.
- The user experience of having to look through hundreds or thousands of collections in the Data Explorer would not be great.
- Your schema will become bloated. Every query you run references your schema. By adding lots of unique collections to the schema, you increase the effort required each time it is referenced.
Method 2 [CORRECT]: One “post” event collection for all customers. E.g. collection = “posts”. Each event in the collection should contain customer_name and customer_id properties so that you can efficiently segment your events by customer. It’s also a great idea to include other info about the customer such as their starting cohort, lifetime number of posts, etc.
    post = {
      "customer": {
        "id": "020939382",
        "name": "Fantastic Fox Parade"
      },
      "post": {
        "id": "19SJC039",
        "name": "All that Glitters in this World"
      }
    }
    // Yes!
    // Add your event to the "posts" collection.
    keen.addEvent("posts", post) // HOORAY
Use Client-Side Unique Event IDs
Particularly for mobile and smart device event tracking, where events are often stored offline and can have interesting posting scenarios, we recommend including your own unique event identifier. It’s as simple as adding a property like device_event_id: <generated GUID>.
By specifying a unique client-side id for each event, you can check to make sure that your device is not sending duplicate events, and that you’re getting all of the events you expect. While you wouldn’t really use this property day-to-day, it can be really handy for troubleshooting edge cases. For example, we’ve seen corner cases where batches of events were repeatedly reposted from the device, and also instances where there were suspiciously more session_start events than session_end events. The device_event_id is really handy for determining root cause in these issues.
keen.id on every single event (internally used to ensure once-only writes). In addition, our open source client libraries, like Android & iOS, also include measures to make sure your batches of events aren’t written twice.
Preventing duplicates using Uniqueness Token
There are cases, such as transient connection error, when you need to retransmit events to ensure that they were delivered to Keen correctly.
This can cause accidental duplication of events. To prevent this, Keen introduced the keen.uniqueness_token, a property in the Keen object, similar to the internal keen.id deduplication mechanism.
The keen.uniqueness_token property can be used as a unique event id.
The value you supply for the keen.uniqueness_token can be set to any UTF-8 encoded string and must not be longer than 64 characters.
We recommend token values to be cryptographic hashes of a list of properties uniquely identifying the event.
For example, in the case of tracking video views, an event representing the “video has been played” could have the following uniqueness token:
uniqueness_token = sha256(video_identifier + timestamp + user_session_identifier)
If a subsequent event with the same keen.uniqueness_token is sent to the same collection within 31 days, it will be dropped silently. Check out our API reference for details on implementation.
keen.uniqueness_token within a single collection will be unique,
but the same Uniqueness Token values can appear in different collections, therefore global uniqueness across different collections is not guaranteed.
Uniqueness Token TTL
Uniqueness Tokens expire after 31 days. If an event is not collected due to an error, you can safely retransmit event streams during this time period and not have to worry about creating duplicate events.
However, it’s important to keep in mind that all events sent to Keen, including those filtered out by the Uniqueness Token deduplication mechanism, will count towards your monthly event limits.
If you reuse a token older than 31 days, then duplicates may be saved. Keen limits Uniqueness Token TTL to prevent expensive full database scans and performance degradation on writes.
Deleted events
When you delete an event with some Uniqueness Token you cannot reuse the same Uniqueness Token for a new event, it would be filtered out by the deduplication mechanism.
We strongly recommend to generate a new Uniqueness Token for each distinct event within a single collection and to avoid using the same token value for distinct events.
Keen will accept the same token value only after the event collection is deleted or after TTL expiration and this behavior cannot be modified.
keen.id and keen.uniqueness_token?
keen.id is Keen’s internal mechanism for event deduplication. Keen generates a distinct keen.id every time an event enters the system.
Then, Keen uses the keen.id to prevent reprocessing of the same event in the case of a failure condition at Keen side.
This will not prevent duplicates in the case a user retransmits an event because Keen will generate a distinct keen.id for each retransmitted event.
When you use the keen.uniqueness_token property, you can specify a token value and Keen will only persist the first event it receives with this token value.
All other events received with the same token value will be filtered out for the next 31 days, guaranteeing exactly once delivery of your event.
Avoid Trapping Your Data: Lists
We recommend that you avoid using lists of objects.
Many filters behave differently when working with lists. It’s worth taking a moment to look these over. The “in” and “eq” filters are noteworthy. Other filters and analyses will also not make sense for object values in a list.
These are similar problems to sending arrays of objects in an event.
In the section below, we describe a scenario of a shopping cart application with multiple items in an order, where we discuss alternatives to modeling this as a list of objects. It can help you think about how you can model similar events involving lists of objects.
Tips for Modeling Events with Multiple Items
A common question that we see is how to model something like a shopping cart transaction which contains multiple items. The most obvious solution, to create one orders collection with one event per shopping cart transaction, is not the best solution. You will not be able to easily see what the most purchased items are because they’re trapped within the shopping cart list object.
To avoid this problem: avoid using lists of objects. The best way to model shopping cart transactions is to create two separate collections. One collection contains an event for each item purchased, let’s call it purchased_product. The second collection contains information summarize the order itself like the total transaction price, number of items, etc, let’s call it completed_transaction.
Now, a basic count of purchased_product will reveal the total number of items purchased, while allowing you to obtain counts grouped by a specific item. By creating two separate collections, one for each item and one for the transaction, you have made your data accessible with the ability to create powerful metrics.
Splitting the data in two collections allows you to very easily and intuitively run queries regarding both individual products (e.g. What were the most popular products purchased) as well as aggregate metrics on orders like, “What is the average order size?”.
    purchased_product = {
       "product": {
          "id": "5426A",
          "description": "canvas shorts",
          "size": "6",
          "color": "blue",
          "price": 10.00
        },
        "order": {
           "id": "0000001",
           "amount": 49.95,
           "number_of_items": 4
        },
        "seller_id": "293840928343",
        "user": {
           "uuid": "2093859048203943",
           "name": {
             "first": "BoJack",
             "last": "Horseman",
             "full": "BoJack Horseman"
           }
        }
      }

      completed_transaction = {
        "order": {
           "id": "0000001",
           "amount": 49.95,
           "number_of_items": 4
         },
         "seller_id": "293840928343",
         "user": {
           "uuid": "2093859048203943",
           "name": {
             "first": "BoJack",
             "last": "Horseman",
             "full": "BoJack Horseman"
           }
        }
      }
The collection purchased_product should contain one event for each product that was purchased, with information about the product (e.g. product id, description, color, etc), in addition to some properties that link the item to the order it belonged to (e.g. order_id, payment_method, etc).
The second collection completed_transaction should contain one event for every purchase transaction. In these events you track information about the aggregate transaction, like total transaction amount, number of items, etc.
Tips for Setting Up Attribution Timeframes
If you need to filter on “hours since step X”, include “hours since step X” as a property in your events. For example, you might include an event property such as hours_since_signup.
This allows you to run queries like “How many people sent data where hours_since_signup < 48”.
You can then also run funnels like:
- Step 1 must have been within 30 days of now.
- Step 2 must be completed within 7 days of Step 1.
- Step 3 must be completed within 7 days of Step 2.
Next Steps
Now that you are a data modeling champion, you are ready to continue sending events to Keen, compute, and visualize your events.
Also, once you have events streaming to Keen, you can learn more about the Data Explorer here too.
