-
 Streams
-
Compute
- Overview
- Group By Ranges & Buckets
- Data Explorer Guide
- Video Completion Funnel
- Saved Queries
- Compute Pricing Guide
- Custom Ad Performance
- Session Timing Metrics
- Cohort Analysis
- Retention Analysis
- Funnel Analysis
- Creating a Funnel with an OR Condition
- Stripe Revenue Queries
- Create a Email Nightly Report
- Query Tuning
- Cached Queries
- Cached Datasets
- Paid Session Metrics
- User Engagement
-
Visualize
Create a Email Nightly Report
The data you track is important to your business, organization, or project. A snapshot of that data can give you insight into whether you’re thriving, surviving, or diving. While it’s good to have immediate access to your important analytics via a dashboard, a nightly report can provide peace of mind or daily motivation.
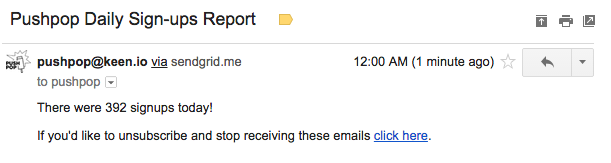
With PushPop, a framework for scheduled integrations between services, you can easily automate a nightly email report like the one above. This tutorial will show you how to use a simple PushPop job description format and PushPop plugins to query for the latest Keen data and use SendGrid to deliver an email to yourself, your boss, your CEO, or anyone else with an email address.
Choose Your Metrics
Chances are you already have an idea of the metrics that are important to you. Perhaps it’s the amount of revenue that was booked, or number of pageviews, or how many people signed up for your service. Exposing this important data through a nightly report email provides a daily glimpse into how your metrics are performing.
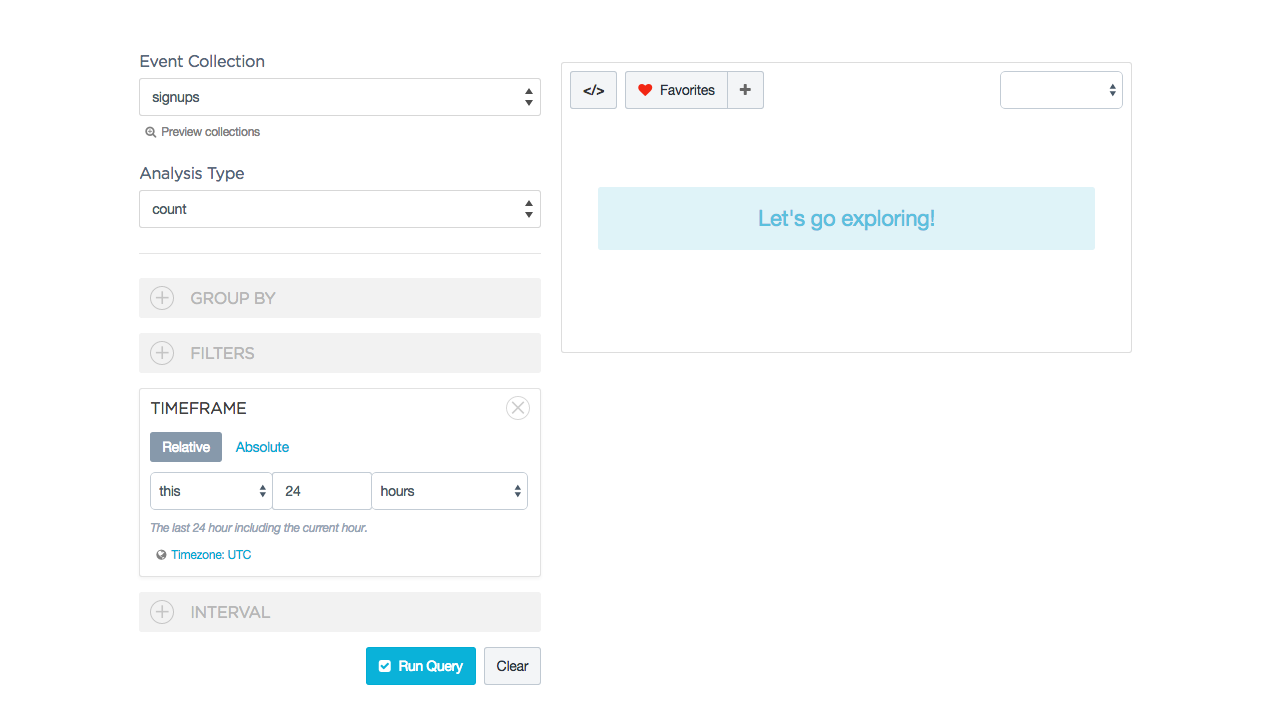
If you’re already storing your data in Keen, you can use the Explorer to run queries on your collections. This will help you understand what you want to see in your nightly report and how to extract that data through a Keen query.
For our example, we’ll look at the number of user signups on the previous day. Let’s say that each time a visitor creates an account on our website we track that data with Keen. The data model for our “signups” collection may look something like this:
{
  "id": 12345,
  "type": "Standard",
  "email": "velva@kovacekbahringer.org",
  "referred_by": "other_account_id",
  "country": "USA"
}
Since we send this data to Keen as soon as the user signs up, the timestamp is automatically inserted for us. From the Explorer, choose the signups collection (you can name it anything you want), select an analysis type of count, and a timeframe of “1 days” or “24 hours”.
Keen allows us to query our data in many different ways. We could see the signups per hour, the last week of signups, or even group by country. For this example, we’ll keep it simple. As you consider your metrics, complexity is rarely a good thing. You want to be able to digest this nightly report in a few seconds every morning.
Install PushPop Locally
Armed with the metrics you want to track, let’s prepare to use PushPop from your local machine. Later we’ll share some best practices for ensuring your nightly reports don’t go interrupted if you shut off your computer.
PushPop is a Ruby gem and can be added to new or existing Ruby projects. Don’t worry if you aren’t a Rubyist, PushPop is designed to be easy to use without writing a lot of complicated code. However, you will need Ruby installed on your machine.
Let’s start by installing PushPop along with it’s Keen and SendGrid plugins:
$ gem install pushpop
$ gem install pushpop-keen
$ gem install pushpop-sendgrid
Or, if you’re using Bundler, add them to your Gemfile:
source "https://rubygems.org"

gem "pushpop”
gem "pushpop-keen"
gem "pushpop-sendgrid"
And run bundle install.
Alternatively, you can clone the PushPop Starter repository which provides a boilerplate PushPop project to quickly get started.
To ensure PushPop is installed, try running the example job from the PushPop Starter repository. If you’re not working from the Starter repo, you can copy and paste the code below and store it in a /jobs directory as example_job.rb. Be sure to create a first_template.html.erb file that puts a simple string like the one below, too.
require 'pushpop'

job 'Simple Math' do

  every 5.seconds

  step 'return 10' do 10 end

  step 'increase by 20' do |response|
    20 + response
  end

  step 'print out via template' do |response|
    html = template 'first_template.html.erb', response
    puts 'Hey Pushpop, let\'s do a math!'
    puts html
    html
  end

end
Now run this command from your command line to check that PushPop is correctly installed:
$ pushpop jobs:run_once --file jobs/example_job.rb
You should see “Hey Pushpop, let’s do a math!” in your Terminal output, followed by “<b>Your math returned 30!</b>” on a second line.
When you use the jobs:run_once option, the job runs immediately, regardless of the interval of time between jobs you have set. If you want to see the fun of PushPop jobs repeating, run this example job with the following command instead:
$ pushpop jobs:run --file jobs/example_job.rb
You’ll need to use Ctrl+C to cancel this repeating job from printing the same output every five seconds. Play around with the interval between job runs by changing the every 5.seconds line. You can find examples in the PushPop jobs documentation.
Of course, the power of PushPop is more than printing out some basic arithmetic. Let’s connect our services and produce your nightly report.
Create Your First PushPop Job
With PushPop you can create jobs that send data from one service to another at a set interval. The services and the interval are entirely configurable, and PushPop has plugins for popular services such as Twitter, Twilio, and Github.
A PushPop job is made up of steps. Steps are where you can perform work such as querying a Keen collection, posting a Tweet, or sending an email. Jobs can contain as many steps as you like.
The structure of a PushPop job is fairly straight forward. Although written in Ruby, the syntax is very approachable. Each job is composed of:
-
name(optional): something that describes the job. -
period: interval of time between jobs -
every_options(optional): options related to when the job runs -
steps: ordered list of steps to run
Let’s use PushPop to query our daily signups and email the result as a nightly report.
Create a new file in your /jobs directory called daily_signups.rb and paste in the following job:
require 'pushpop-keen'
require 'pushpop-sendgrid'

# Define our job and name it
job 'daily signup count email' do

  # Set our period / time interval for the job to run
  # Set every_option 'at', indicating the time we wish the job to start
  every 24.hours, at: '00:00'

  # Define a step to interact with Keen
  keen do
    event_collection  'signups'
    analysis_type     'count'
    timeframe         'last_24_hours'
  end

  # Define a step to interact with Keen
  sendgrid do |response, _|
    to           'joe+joe@superemail.com'
    from       'joe+joe@superemail.com'
    subject   'Pushpop Daily Sign-ups Report'
    body      "There were #{response} signups today!"
  end

end
Before you try running this job, you’ll want to make a few changes. First, change the to and from email addresses to ones that you control. Secondly, include your API credentials for Keen and SendGrid by adding them to a .env configuration file:
KEEN_PROJECT_ID=abcdefg1234
KEEN_READ_KEY=abcdefg1234

SENDGRID_DOMAIN=abc.defg.1234
SENDGRID_USERNAME=abcdefg1234
SENDGRID_PASSWORD=abcdefg1234
If you don’t have a SendGrid account, you can sign up for free.
Now try running your first job:
$ pushpop jobs:run_once --file jobs/daily_signups.rb
Don’t expect to see any results in your Terminal window. Go check your email! Your very first nightly report should be waiting in your inbox.
As you get familiar with PushPop, you’ll want it running all the time, and you’ll likely have multiple jobs. Here’s how you run all jobs in the /jobs directory, recurring at the intervals set forth in their PushPop jobs syntax:
$ pushpop jobs:run
Note that you will need to leave the process running in your terminal, or send it to the background, so that it keeps running. You can make a process run in the background by appending an ampersand (“&”) to the end of the command.
However, more likely you don’t want these commands running indefinitely on your local machine. A better option is to deploy them to a server, where you don’t have to worry about interrupting your nightly report and other jobs.
Deploy Your PushPop Jobs to Heroku
It’s a good idea to host your PushPop jobs on a dedicated server or external service instead of your local machine. Hosting your project on an external service, such as Heroku, can ensure consistent performance. Running other programs or operations on a local setup might disrupt your PushPop jobs.
In order to deploy your PushPop project to Heroku, you’ll need to add a Procfile to the main directory of your project. This will enable you to use workers, queue up jobs, or run your jobs in the background. For example the following Procfile will start up a worker and run all jobs found in the /jobs directory:
worker: bundle exec pushpop jobs:run
If you’re working from the PushPop Starter project, it comes (nearly) ready to be deployed to Heroku. You’ll need to uncomment the gems you need in the Gemfile and also purchase a Heroku dyno to ensure your job doesn’t enter a sleeping state.
For more on deploying Ruby apps to Heroku, check out their guide on Getting Started with Ruby.
Next Steps With PushPop
Along with plugins for Keen and SendGrid, PushPop has plugins for Twitter, Github, Twilio, and reading text file contents. There’s also a helpful template to create your own plugin to integrate other services.
To get more creative with how you query metrics from Keen, see our data analysis guide, which walks you through the many ways to pull insights from your data.
Questions? Reach out to us at anytime at team@keen.io or chat with us on Keen Community Slack! We also have a whole team of folks dedicated to helping you get the most out of your data – if you’d like to learn more, reach out to Schedule a free data consultation with our data science team.
