Introduction
How many tools are in your company’s tech stack? If you’re like the average software company the number is probably a staggering 37 or more. Take a typical Customer Success organization for example. You have your customer ticketing software, your customer relationship management tool, your customer success software, your live chat platform, customer data platform, and more.
Each of these platforms provide helpful insights into the performance of your Customer Success team, highlighting what they do great and where they have opportunities to improve. The catch? This data is spread across 5+ platforms, so your team must shuffle between systems or spend valuable time aggregating data.
Enter, Airbyte and Keen. Keen is a data streaming and analytics platform helping users create custom analytics in minutes, not months. With Airbyte, you can easily send data from 100+ platforms to Keen for unified analytics and dashboarding. Your marketing, sales, product, and customer success teams can finally have a single view to fully understand the impact they are having. Use this data to make strategic, data-backed optimizations to accelerate your growth.
This tutorial will explain the steps you need to take to stream data from Salesforce and Zendesk to Keen to gain a 360-degree view of your business using Airbyte.
Pre-requisites
- You’ll need to install Airbyte to move your data. To deploy Airbyte, follow the simple instructions in our documentation here.
- Salesforce, Zendesk, and Keen are SaaS services, and you’ll need to have an account on these platforms to get started. Note: You need a Salesforce account with API Access. Salesforce editions with API access include: Enterprise, Unlimited, Developer, and Performance. For other editions, please contact Salesforce support for help enabling API access.
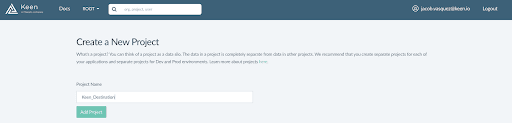
- For the Destination, you will need to create an empty Keen project to host your data. To do so, click on the ‘Add New’ button as shown in the navigation bar.
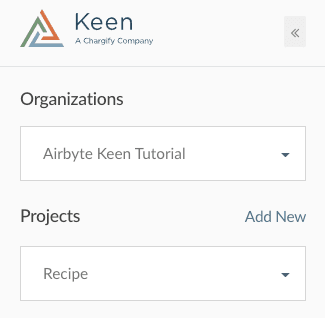
Give your project a name and then select ‘Add Project’. In the example below, we have named our database ‘Keen_Destination’. You can think of a project as a data silo. The data in a project is completely separate from data in other projects. We recommend that you create separate projects for each of your applications and separate projects for Dev and Prod environments.
Step 1: Set up the Keen Destination in Airbyte
First, visit http://localhost:8000
If it’s the first time you’re launching Airbyte, you’ll need to customize your preferences. Then, you’ll be offered a quick onboarding for the application. You can complete the walkthrough or skip it and continue with the following steps.
Navigate to the Destinations tab and create a new Keen Destination Connector.
Now, it’s time to set up your connector.
In the Keen application, navigate to your project’s Access tab. You will need to copy your Project ID and Master API Key. Then, paste this information into the connector configuration in the Airbyte application. Don’t forget to give your connector a name!
Note: By default, the Keen connector will infer the keen.timestamp field based on the data from the event that occurred in the source application. This ensures the most accurate analytics for time-related data. If Keen cannot infer the timestamp or you choose to disable this functionality, keen.timestamp will hold the value of time when the record was saved in Keen.
That’s it! Now, you’re ready to connect Keen with the source of your choice.
The Keen destination supports 3 synchronization modes. You can specify the mode for each stream:
- Full Refresh – Overwrite: This mode replaces all the old data in Keen collection
- Full Refresh – Append: This mode fetches all the data from source every time and appends it to an existing collection
- Incremental Sync – Append: This mode adds only new, or modified records for each synchronization. During the first run, it works the same as a Full Refresh, but for each next run, only records that were not present before will be fetched
Not all streams support all synchronization modes.
For more information regarding connection settings, check the connections and sync modes documentation.
Step 2: Create a Salesforce Connected App
The Salesforce connector uses OAuth2 for authentication, so the steps required to setup the source connector will be different than simply copying and pasting API keys. In this tutorial, we cover how to obtain access and refresh tokens from the Salesforce REST API and stream your Salesforce data to Keen for custom analytics.
In order to use the Salesforce Airbyte connector, you need to create a Connected App. To do this:
- Navigate to the Setup panel
- Then, choose App → App Manager from the left-hand, side panel.
- Finally, click the ‘New Connected App’ button.
Now, it’s time to fill in all of the required fields: Connected App name, API name, and contact email.
For the API (Enabled OAuth Settings) section, click the checkbox. Fill in the details as follows:
- Set Callback URL as https://login.salesforce.com/
- From Available Oauth scopes choose:
- Access and manage your data (api)
- Perform request on your behalf at any time (refresh_token, offline access)
- Provide access to your data via the Web (web)
Now, click the save button. Voila—your connected app is ready !
Step 3: Generate Salesforce’s OAuth Access Tokens
After creating your connected app, the next step is to generate the OAuth access token. This will allow you to securely connect Salesforce to Keen. First, you’ll need the authorization code.
- View the connected app that you’ve previously created.
- Note down the Consumer Key.
- In a new tab, navigate to https://<YOUR_INSTANCE>.com/services/oauth2/authorize?response_type=code&client_id=<CONSUMER_KEY>&redirect_uri=https://login.salesforce.com/
- Substitute the Consumer Key with one grabbed from Connected App preview.
- Substitute <YOUR_INSTANCE> with your Salesforce domain (in our case, we’re using the whole name together with lightning.force suffix).
- If you’re asked to, allow any required access.
- Now the authorization code should be visible in the URL, it’s the part preceded with `code=`. In our case it is: https://login.salesforce.com/?code=aPrxpFJSIE1vdWxneshUMx6029j8wT_8l5_etMhl74hZ0mX4LMcg_MFzQ1OmvwA7rQDmw44osg%3D%3D
Once you have the authorization code, you can easily generate access and refresh tokens. To do this, you need to execute an HTTP POST request for the following url:
https://<YOUR_INSTANCE>.com/services/oauth2/token?code=<CODE>&grant_type=authorization_code&client_id=<CONSUMER_KEY>&client_secret=<CONSUMER_SECRET>&redirect_uri=https://login.salesforce.com/
You can use curl, or any http client or platform capable of executing http requests, that you’re familiar with.
If you are using curl, execute the following command:
curl -X POST https://<YOUR_INSTANCE>.com/services/oauth2/token?code=<CODE>&grant_type=authorization_code&client_id=<CONSUMER_KEY>&client_secret=<CONSUMER_SECRET>&redirect_uri=https://login.salesforce.com/
- <YOUR_INSTANCE> should be taken from your account URL. If your app’s domain contains lightning.force in its domain, you have to substitute it with my.salesforce. In our case, the final name of our instance would be: keenairbytedoc-dev-ed.my.salesforce.com
If your app’s domain already has the form of X.salesforce.com, you should be fine with using it without any additional changes. - <CODE> is the authorization code generated in the previous step. It expires after some time, so you may need to regenerate it.
- <CONSUMER_KEY> and <CONSUMER_SECRET> are visible in the Connected App preview at the Salesforce site. You need to click the label next to Consumer Secret to reveal it.
A successful request will return your access_token, refresh_token and some additional properties. Grab the refresh_token, as it’s needed by the Airbyte Connector.
Step 4: Set up the Salesforce Source in Airbyte
Now, you are ready to create a Salesforce source at Airbyte. Navigate to your Airbyte instance and create a new source by following the steps below
- From the list of available connectors, choose Salesforce.
- Fill all the required fields.
- Give the connector a name,
- Then fill client_id and client_secret. You should already be familiar with them, as we used the same data for the token generation.
- Fill in the refresh_token with the value that you’ve got in the previous step and choose the start_date. Note: Data before this date will not be replicated at Keen.
Step 5: Create an Airbyte Connection from Salesforce to Keen
Next, connect the Keen Destination with the newly created Salesforce source. Choose your desired synchronization frequency and which streams you want to replicate to Keen. There are 350+ event streams to choose to replicate. For this example, we’ll choose two streams: Account and AccountHistory. Set up the connection, and launch the first synchronization. Soon, you will see records start to appear in your Keen project.
Step 6: Replicate Data from Zendesk to Keen
You can follow similar steps to the Salesforce example above to connect other Customer Success tools to Keen. To add Zendesk, you will:
- Set up the Zendesk Source.
- Enter your Zendesk Authorization Credentials. (OAuth2 is not required by Zendesk, so this process will be a simple copy and paste.)
- Choose your sync frequency.
- Add the table prefix of ‘zendesk-’.
- Select the data you want to sync and set the sync mode to a ‘Full Refresh’.
- Finally, set up the connection and launch.
Now, your Salesforce and Zendesk data is being replicated to Keen for unified analysis and dashboarding.
Step 7: Analyze your Salesforce data using Keen
Streaming your Salesforce and Zendesk data to Keen, gives you the ability to run custom analysis and uncover relevant insights and trends. You can also stream data from other tools in your tech stack to analyze alongside this data. Popular examples include Intercom, Drift, or any other Airbyte supported connector.
The Data Explorer is a tool in the Keen app that enables you to perform a wide array of analysis on your data by creating, running, and managing queries. For this example, let’s say you are interested in getting a count of your churned customers by industry.
To do this, you would use the following query parameters within the “QUERY” tab.
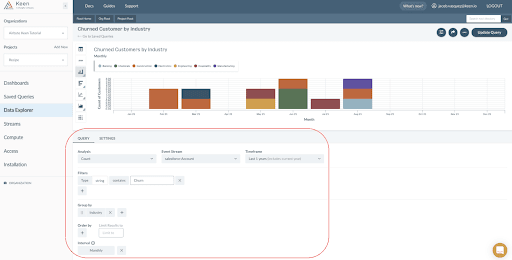
You can save this query to be reused. After saving, your query is ready to be added to a dashboard.
Step 8: Create a Dashboard using your Salesforce and Zendesk Data
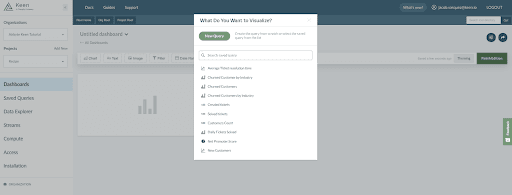
The Dashboard Creator is a drag-and-drop tool that allows you to quickly create reports and share them with relevant internal or external users.
Navigate to the dashboards tab and select, New Dashboard. Then, add the chart you created by selecting the ‘Chart’ button, and clicking on the name of the chart.
Below is an example of a Customer Success Dashboard that unifies Salesforce and Zendesk data followed by the query parameters.
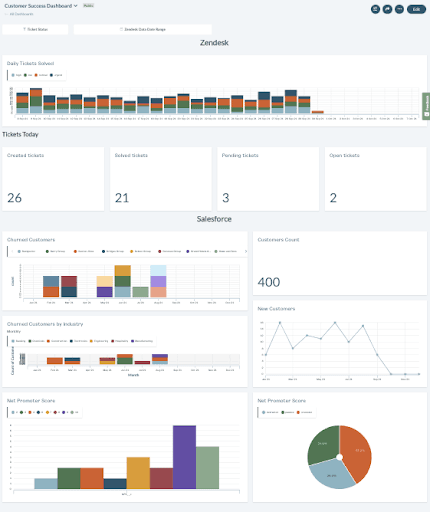
Query Parameters for Customer Success Dashboard:

Wrapping up.
To summarize, here is what we’ve done during this recipe:
- Set up the Keen Destination in Airbyte
- Created a Salesforce Connected App
- Generated Salesforce OAuth Access Tokens
- Analyzed Salesforce Data in Keen
- Created a Customer Success Dashboard using Salesforce and Zendesk data
This allows Customer Success teams to save valuable time by having a single view of their performance—no more shuffling between systems. And, by having a complete view of your customer touchpoints you can make informed decisions that create the best user experience.
Not already using Keen? Sign up for a 30 Day Free Trial to get started today. Happy Analyzing!