The Internet of Things (IoT) is a pretty fascinating field of innovation. Relatively simple collections of data (e.g. when there is and is not movement sensed in the vicinity) can be used to tap into a trove of information that could enrich someone’s lifestyle, productivity, progress towards goals, and so on. As a proof of concept of a DIY IoT device that measures lifestyle data in a meaningful way, I build a sleep tracking device using Keen IO and Electric Imp!
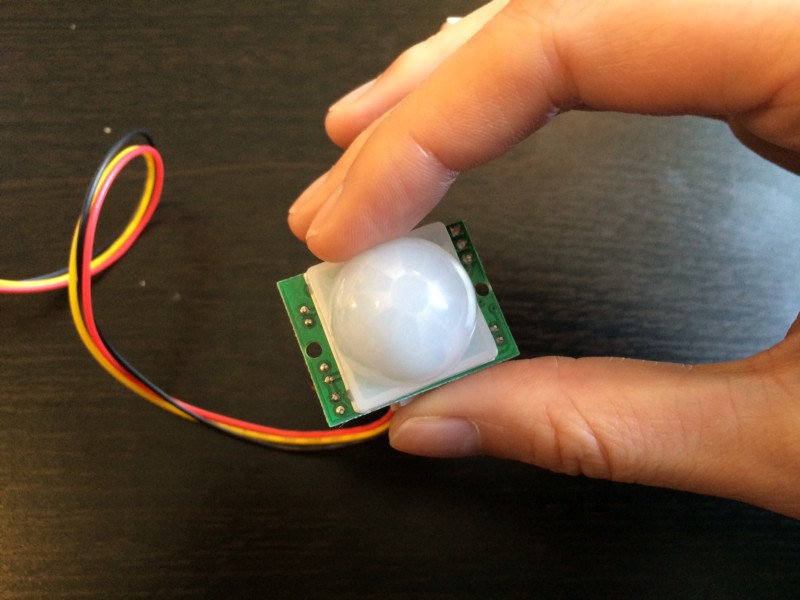
In a nutshell, my device is just a simple passive infrared (PIR) sensor connected to an Imp card, which in turn talks to Keen IO. The PIR sensor is a relatively cheap little motion sensor that detects changes in infrared radiation levels (e.g. human movement) within 20 feet. If well-placed in your home, a PIR sensor can tell when you’re active and when you’re not. And for me at least, long periods of inactivity correlate to the times when I’m sleeping or at work.
This was my first time playing with an Electric Imp as well as my first time using Keen IO, and I got my device up and sending event data in a little over an hour. I don’t have a ton of data yet, but, in the weeks since I’ve set up my sleep tracker, I’m already beginning to see that the earlier I start moving, the longer I stay out of my apartment during the day. I suspect that longer periods of rest correlate with waking up earlier, but I’m still not positive if that’s actually the case. Either way, I’m excited to see what a few more weeks of data will reveal, and how it might be able to help.
If you’d like to build your own motion-sensing device, here are the details:
Getting Started (10–15 minutes)
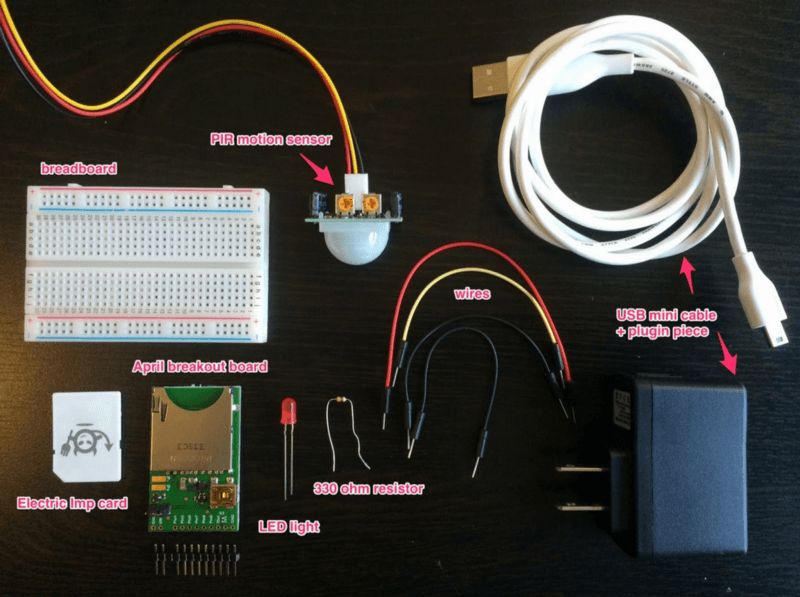
For supplies, we’ll need an Electric Imp card and an April breakout board, a breadboard, some wires, a USB mini cable, a 330-ohm resistor, an LED (or several LEDs), a PIR motion sensor, and a free Keen IO account.
First, let’s connect our Imp card to our WiFi network and log into Electric Imp’s IDE. To do this, we BlinkUp using an iPhone or Android phone. BlinkingUp involves plugging our Imp card into the April board, connecting it to a power supply, and using a phone to flash a specific pattern of light that the Imp reads to get your network configuration. It’s a little bit like Morse Code, only with light.
NOTE: BlinkingUp has a sort of strobe light effect, so if you’re sensitive to that sort of thing, it’s a good idea to turn the phone away from you. (There are audio cues to let you know when the light begins and ends.)
If everything goes well and the Imp’s connected, it will blink green. If it remains unconnected, or if it’s still thinking about connecting, it’ll blink red or orange, respectively. (For a complete guide to what your Imp may be feeling, check out this Color Guide.)

PRO TIP: If your Imp isn’t connecting to your Internet network, double-check that your WiFi password is correct. (Electric Imp won’t cue you into the fact that your password is wrong.)
Once we have the Imp connected and online, we can start coding!. Electric Imp only supports Squirrel, a language similar to Lua but built for embedding in electronics. We’ll be using Electric Imp’s IDE to write and send code to our device.
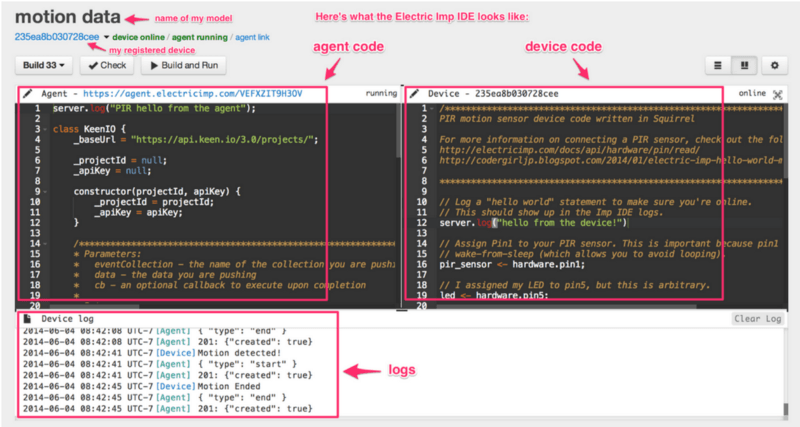
You’ll notice there are two code windows in the IDE: one for device code and one for agent code. The device code will run on the … device (shocker). The agent code will run on the Imp cloud, and this is where you’ll add your code for Keen IO. There’s also a panel where you can read your logs — super helpful to confirm device-to-agent communication — but you’ll only be able to see this panel if you’ve registered a device.
“Hello World,” Blinking-LED-Style (5–10 minutes)
Enough preliminary info, time to bring our Imp to life! Electric Imp has a great tutorial to help you get an LED blinking — the Imp equivalent of “Hello, world!” To get going, you’ll only need your Imp card, April board, LED light, and a resistor.
NOTE: LEDs are pretty easy to blow out, which is why a resistor is used in place of a wire in the tutorial. A resistor can also be used in addition to a wire.
- Connect an LED to a pin on your April board via a 330-ohm resistor.
- Write your Squirrel device.nut code.
- Click “Build and Run” in your Imp IDE. Your LED should be blinking now.
Your device code should look something like this:
// Log a "hello world" statement to make sure you're online.
// This should show up in the Imp IDE logs.
server.log("Hello from the device");

// create a global variable called led,
// and assign pin9 to it
led <- hardware.pin9;

// configure led to be a digital output
led.configure(DIGITAL_OUT);

// create a global variable to store current
// state of the LED
state <- 0;

function blink() {
  // invert the value of state:
  // when state = 1, 1-1 = 0
  // when state = 0, 1-0 = 1
  state = 1-state;

  // write current state to led pin
  led.write(state);
  agent.send("led", state)

  // schedule imp to wake up in .5 seconds and do it again.
  imp.wakeup(0.5, blink);
}

// start the loop
blink();
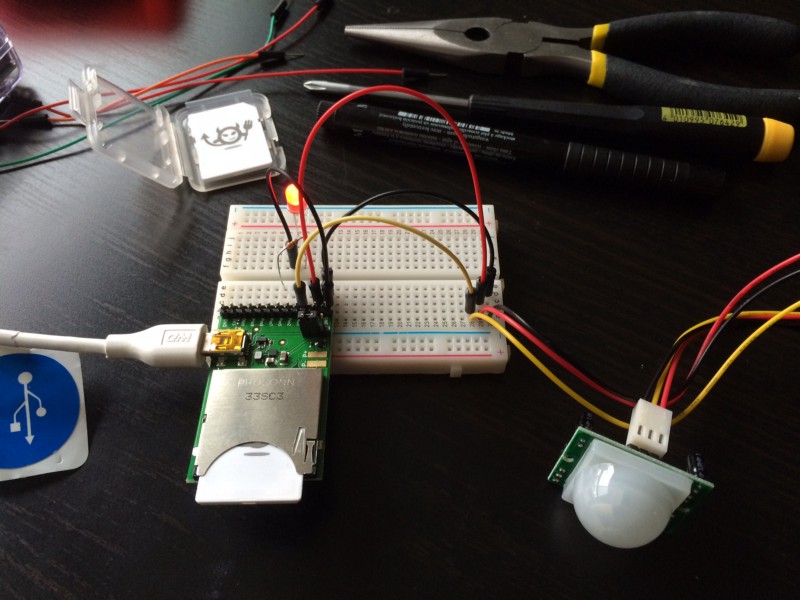
Testing The PIR Sensor (15–20 minutes)
Once we’ve confirmed that our device code actually works on our device (i.e. our LED blinks because we told it to), we can start testing our PIR sensor. These guides on using and testing PIR sensors can give you the full details, but here are the basic steps:
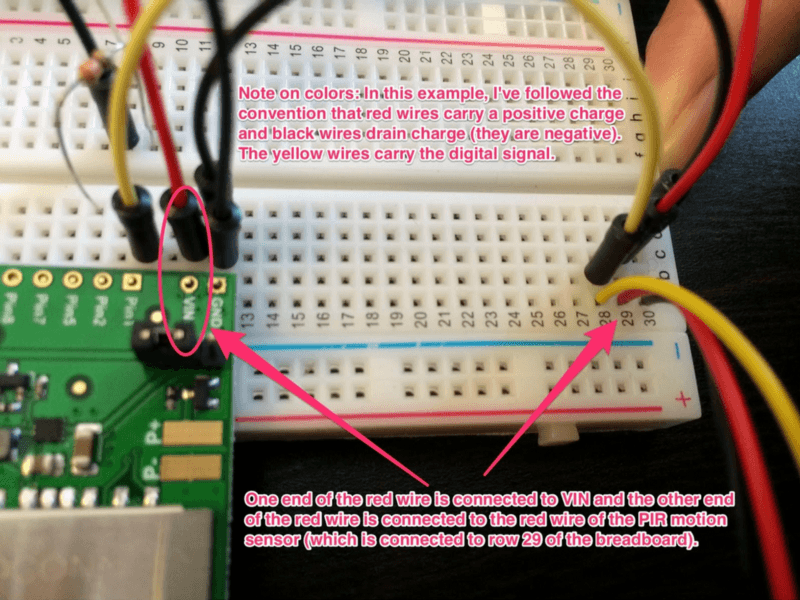
- Connect the attached red wire to VIN on the April board.
- Connect the black wire to GROUND, right next to VIN.
- Connect the remaining wire to PIN1.
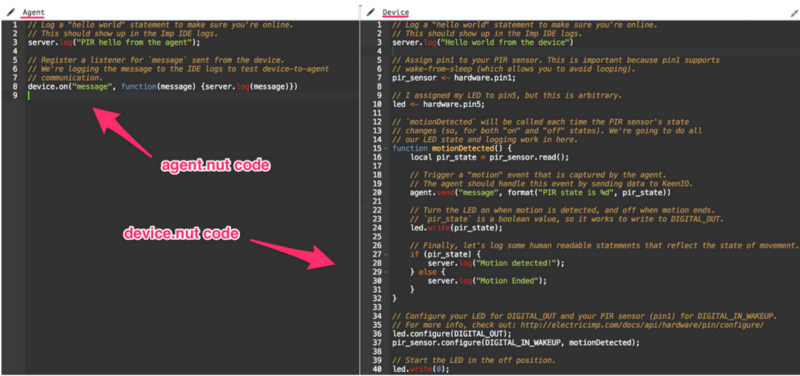
- Write your Squirrel device.nut code.
- Write your Squirrel agent.nut code.
- Click “Build and Run” in your Imp IDE and check the logs. (You may need to reload the page.)
(For specific information on configuring digital pins, I used the Digital Input and pin.configure pages from Electric Imp’s dev center.)
NOTE: Not all April board pins are created equal. It’s important to assign PIN1 to the PIR sensor because PIN1 supports wake-from-sleep. For more information, check out the page on configuring pins.
If everything works, you should see log statements that say something like “movement detected” and “movement ended,” or whatever you decided to write in their place.
Connecting Your Imp to Keen IO (20–30 minutes)
NOTE: If you haven’t already created a Keen IO project, now would be a good time to do so. For a quick walkthrough on how to get set up, check out Keen IO’s Getting Started Guide.
Now we can connect our motion-detection device to Keen IO! This part requires us to modify one line in our device code (device.nut), paste a snippet of Keen IO code into our agent code (agent.nut), and add our Keen IO Project ID and our Keen IO Write API Key to the agent code.
The line of code in device.nut that connects our device to our agent should look something like this: agent.send("motion", pir_state);
// `motionDetected` will be called each time the PIR sensor's state
// changes (so, for both "on" and "off" states). We're going to do all
// our LED state and logging work in here.
function motionDetected() {
    local pir_state = pir_sensor.read();

    // Trigger a "motion" event that is captured by the agent.
    // The agent should handle this event by sending data to Keen IO.
    agent.send("motion", pir_state);

    // Turn the LED on when motion is detected, and off when motion ends.
    // `pir_state` is a boolean value, so it works to write to DIGITAL_OUT.
    led.write(pir_state);

    // Finally, let's log some human readable statements that reflect the state of movement.
    if (pir_state) {
        server.log("Motion detected!");
    } else {
         server.log("Motion Ended");
    }
}
This line says “send a message to the agent called ‘motion’.” In our agent code, we are listening to messages from the device with this line: device.on("motion", function (state) {
const KEEN_PROJECT_ID = "FILL THIS IN";
const KEEN_WRITE_API_KEY = "FILL THIS IN";

keen <- KeenIO(KEEN_PROJECT_ID, KEEN_WRITE_API_KEY);
device.on("motion", function(state) {

    local eventData = {
        type = state ? "start" : "end"
    };

    // send an event synchronously
    local result = keen.sendEvent("motion", eventData);
    server.log(result.statuscode + ": " + result.body);
});
In this basic example, “motion” signifies my collection of events and pir_state signifies the type of motion (e.g. “start” or “end”).
At this point, we should be able to see data events on our Keen IO project page, as well as log statements in the Imp IDE. If so, our Imp device is connected to Keen IO! Huzzah!

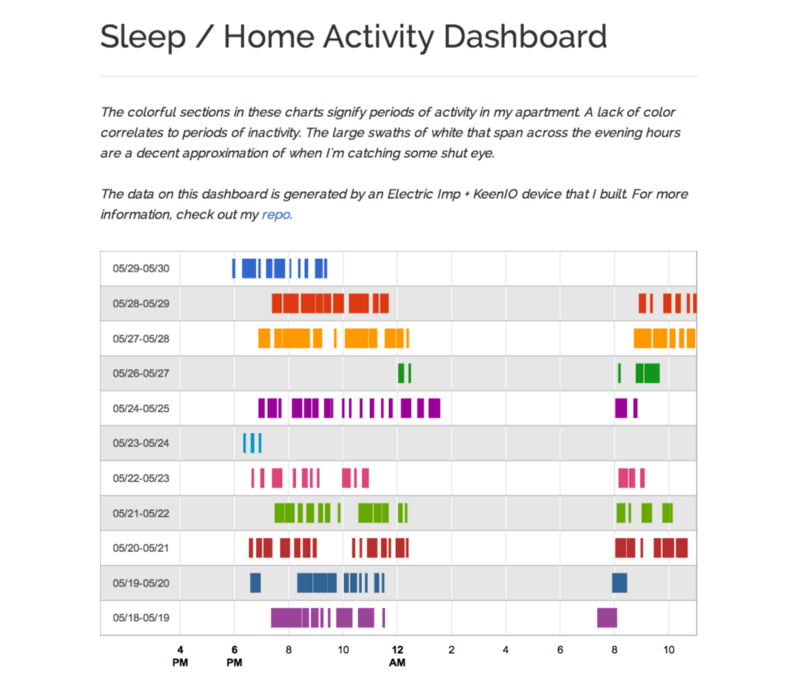
Building A Dashboard (20–40 minutes)
Now we’re at the point when we can actually analyze our data! Keen IO has a variety of tools to dig into the data that we’re saving from our Imp, including timeframe and filters. For this project, I put together a dashboard that helps me quickly see the motion recorded in my home by hour over the last two weeks. The graphs help highlight periods of activity in a 24-hour time period. I created the graphs using the timeline chart from Google with a bit of data massaging to get Keen IO’s data to work with the charts. Keen IO also has a great set of data visualization tools, which you can check out here.
In order to sync my data from Keen IO with my Google timeline chart, I used timeframe, count, interval, and filters in Keen IO’s data analytics APIs. The JavaScript for my dashboard does the following:
- Collects motion event count within a 24-hour period from Keen IO, on a minutely basis.
- Flattens all the data into a single array.
- Groups the data into rows.
- Buckets the data in each row into chunks of activity and downtime.
- Draws the chart and sets it to automatically refresh every 5 minutes.
Cool! So What’s Next?
This is where things get interesting — from here, we can add more detailed event data, data visualizations, and really dig into the data analysis. Just think: with a basic PIR motion sensor, we can track when we’re in a given space, how long we’re active in that space, and the resulting patterns over an extended period of time. This may seem like basic data, but the use cases are pretty significant. Using home activity data, we could optimize our energy consumption (e.g. when our heat or lights are on), have basic security information, and get feedback about lifestyle goals (e.g. how much rest we get).
With Electric Imp, we can build all sorts of internet connected devices. And with Keen IO, we can track anything we want on any one of those devices, gathering new data — and new insight — on them. Plus, we can keep tabs on the latest events by implementing an email feature using Keen IO’s Pushpop. The Internet of Things is pretty sweet, and data makes it all the sweeter. If you’re interested in exploring how else Keen IO can be used with Electric Imp, or if you have any questions about my project, shoot me a message.