If you’ve read our blog, The Pros and Cons of Implementing Event Tracking At Scale with Google Tag Manager, you know that we’ve recently created a Keen Tag Template for Google Tag Manager (GTM). As we went through the development process, we jotted down some notes, took a few screenshots and voila! We present to you: a step-by-step tutorial so that you can follow along and create a tag template for your own application.
Contents
- Navigating to Template Editor
- Template Setup
- Permission Configuration
- Testing Your Template
- Final Tag Template Inputs
QuickLinks
Navigating to the Template Editor
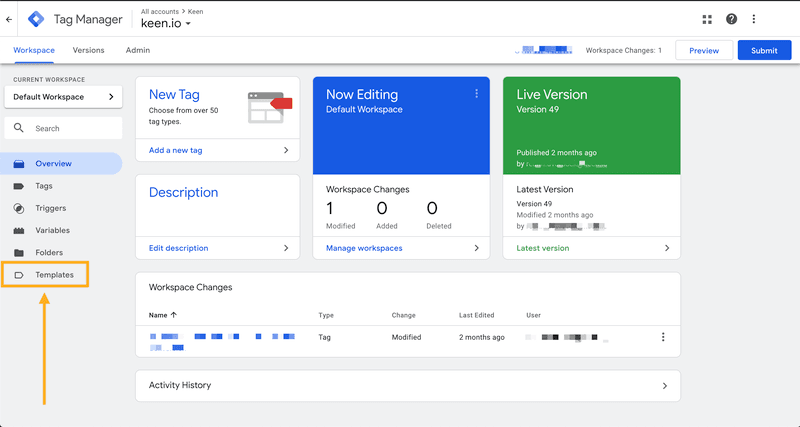
The first step in creating the Tag Template for Keen.io’s tracking library is to log into your Google Tag Manager workspace. Navigate to the account where you have the container that houses the tags used for your websites. Then, navigate to Templates via the navigation link on the bottom of the left-hand side of your workspace.
Template Setup
Once you’ve located the Templates section within the UI, click on the “New” button in the Tag Templates section next to the ‘Search Gallery’ button on the top right of the tag templates menu. Here we find the Template Editor, the space where the development process for Google Tag Manager Templates exists.

The first order of business is a bit of housekeeping. Fill out the ‘Info’ fields to provide a name for your tag template. Optionally, you can add a description and icon, as well as check the box for the Community Template Gallery Terms of Service if you plan on sharing your tag template publicly in the GTM Community Template Gallery.
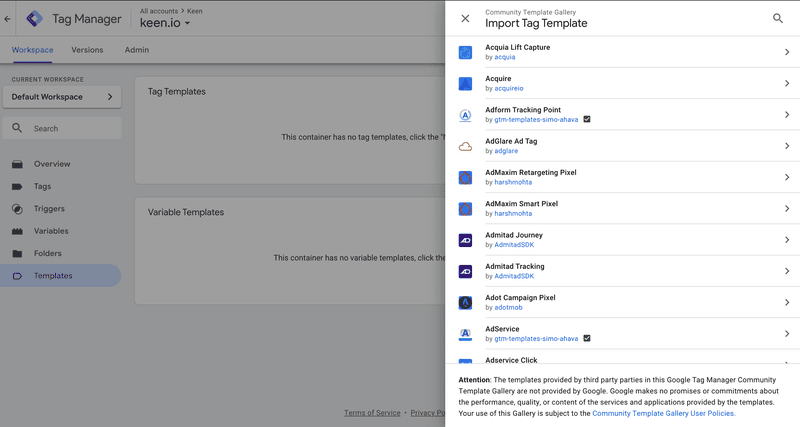
You can view the existing Community Templates that Google Tag Manager provides direct access to within the workspace as well as any templates that you have created with the editor. If this is your first time importing a tag template, simply click on ‘Search Gallery’ to browse all available third-party tag templates. They will be available as options when configuring new tags for your containers.
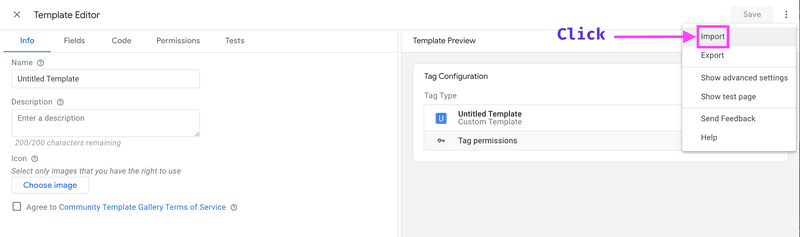
If you want to use a template that isn’t within the Community Template Library or that you haven’t created within your workspace simply use the import feature. To use the import feature you must have a .tpl file on your local machine which you then select after going to the template editor settings (the three dots in the top right hand corner). Click on import and select the .tpl template file that you have on your local machine.
After you have named your tag template, you should click save to avoid losing your work and having to start over. Once this is completed, we can add some features to our input form by navigating to the Field Tab.
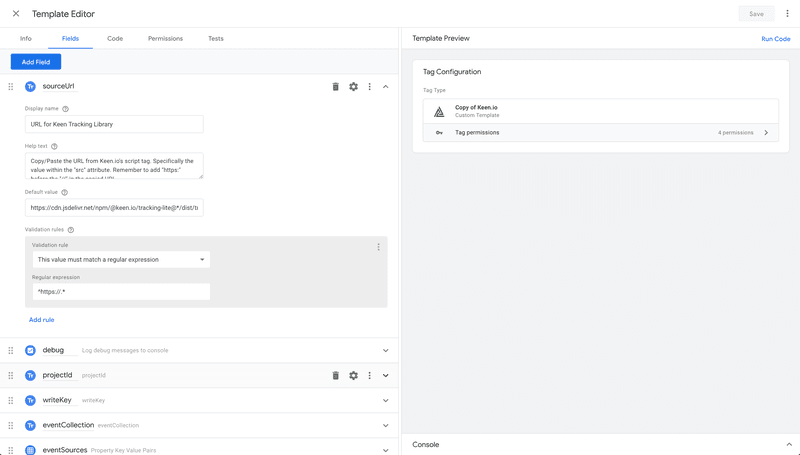
First, we will add a field for the injectScript API to load Keen’s tracking library from CDN by passing in the URL where the CDN is hosted with JSDelivr. Follow up by adding a radio checkbox to allow for debug mode allowing your users to provision permissions for logging to console. Next add three text input fields for your project id, Keen.io API write key, and event collection name. Event collections are where you want to stream the events tracked with the Keen.io tracking script and are sort of similar to tables within a relational type of database. Finish up by adding a two column table for any properties and values you would like to extend the collection with, and a drop down field that will be used to select different types of events we want to configure to be available for tracking through the data layer.
In the image below, you can see the Fields tab in the Template Editor with the input forms fields added and configured with the required fields necessary to pass in your credentials and granularly select what type of events any tags created from the template will have access to track. You can also designate where you want to send the data for those events to be housed within our platform, specifically in regards to the endpoints that the tag will make POST calls to. This is because our REST API endpoints follow this pattern for the URLs, which as you can see contain the project id and the name of an event collection.
https://api.keen.io/3.0/projects/PROJECT_ID/events/COLLECTION_NAME
Permission Configuration
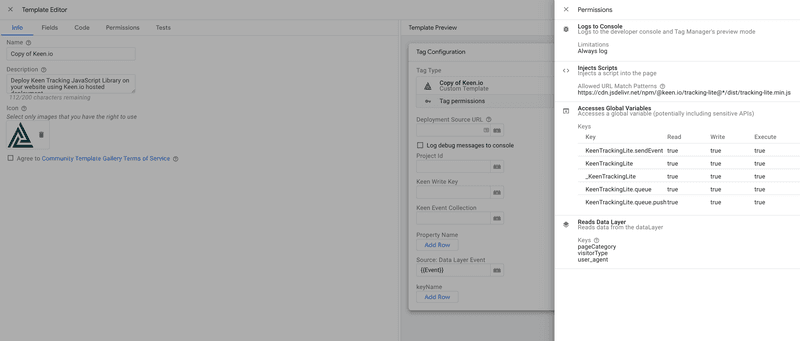
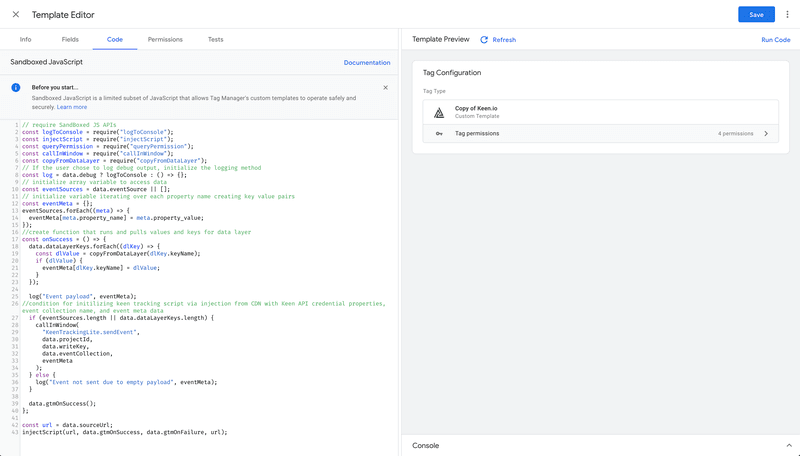
Now is an excellent time to become familiar with two features here in the tag template editor: permissions built into Tag Templates, and policies. Thankfully permissions are for the most part assigned here for you as the available permissions are detected based on the specific APIs required by the code you develop for your specific template that lives in the sandbox accessed through the Code tab in the Template Editor. The permissions may be automatically populated here for you in the editor, but you still have to do some configuration, you can set limitations on the detected permissions.
Click on the Permissions tab, which you can see below. Doing this will open up a view where you can view specific permissions that have been granted for the tag template that you are currently working on. You can also configure the different permissions as necessary to allow your code to run. For example, to do anything with injected keen tracking script, its Global variables must be added and allowed permissions for read, write, and execute. Another example here is the keys in the Reads Data Layer permission. If you don’t put the keys for the events you need to track from the data layer into the text field within this section, then your tag will not have access to the values for any events associated with that data layer key.
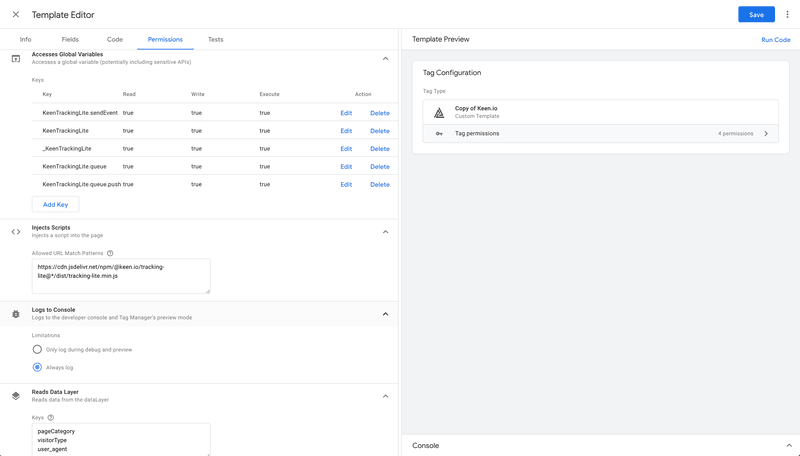
Getting these permissions properly configured is crucial so I am providing one last example to hammer this concept home. In the image below we see that permissions have been given for logging to Console. These permissions are associated with the Sandboxed JavaScript logToConsole API. We also see the output from our Sandboxed JS script being logged to the console on the right hand side of the Template Editor view within the Template Preview section. Without the Logs to Console permission there would be no output, meaning that nothing would show up in the console section. Of course, we need to log to the Console to aid us in debugging our code while developing templates, so it is automatically assigned here to allow for output from our system to be output to the console.
The next step will be to add a checkbox to the form. This is added to allow us to toggle logging to the console in debug mode via the logToConsole API as necessary outside of preview mode. I took this a step further and selected the option to always log, meaning that console output even without having to set up the radio input field for debug as we previously covered in our discussion about the input fields. This is a tradeoff between security and convenience. The vectors for attack on a site or app through tags created with less or no access to the console are reduced when compared to a tag configuration that always allows access to the console.
Please make sure to familiarize yourself with the Sandbox JavaScript APIs as well as portions of the standard library that are available with the Sandbox. You will be required to write code in syntax unique to the Sandbox, so it is a learning experience. I recommend diving in upfront to save many hours of frustration and confusion as to why your code won’t compile within the Sandbox.
Testing Your Code
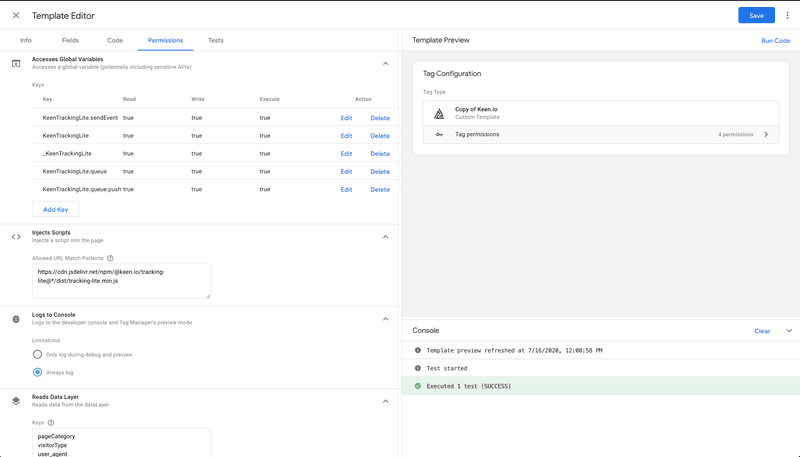
To see this in action, click on ‘Run Code’. You will see output for the existing boilerplate code appear below within the Template Preview section of the Template Editor.
Here you will see that the environment refreshes, starts running test code, and declares hoisted values for the data variable. The boilerplate in the new Template Editor then calls the logToConsole API and prints the gtmTagID and gtmEventID properties and values for the object. Finally, you will see that the default test has been executed successfully. This corresponds with the existing code prepopulated for new tag templates, which you can see by clicking on the Code tab.
Log output to the console for the data.gtmSuccess method is displayed within the template editor. The data values for the tag (tag id and event id) are passed into the data variable using the data—gtmOnSuccess API call. Due to hoisting, the values are assigned to the data variable before they are logged to the console.
Final Tag Template Inputs
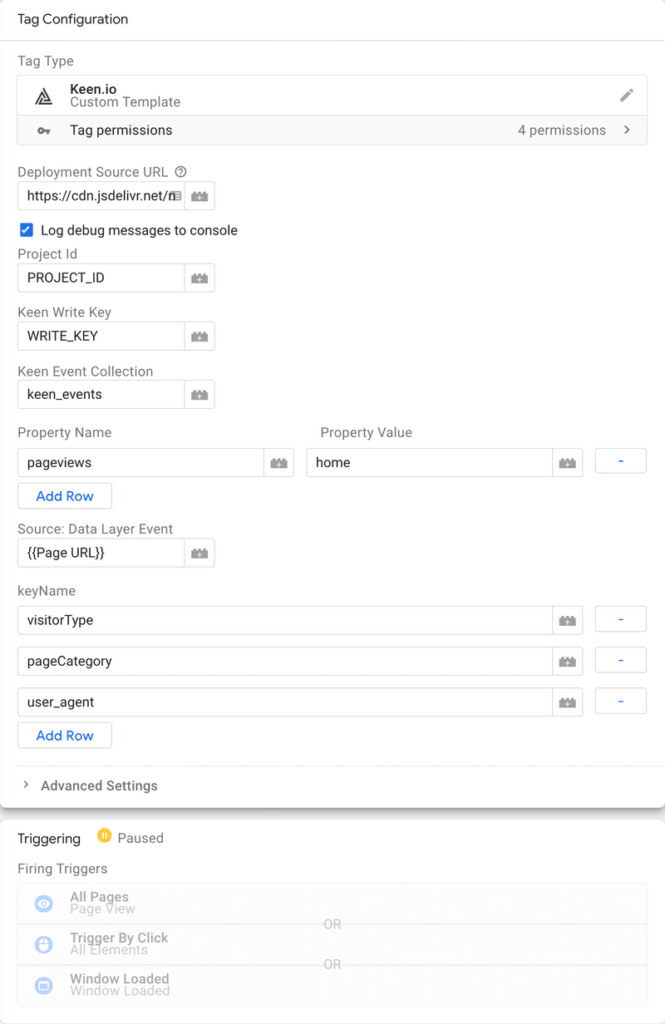
Here’s an image of a custom tag with Keen event tracking being created from our Keen Tracking Tag Template for Google Tag Manager. Your own tag or variable templates will look similar.
That wraps up the tutorial on how to create a GTM Tag Template! You can sign up for free with Keen today to start tracking billions of events in real-time, and download our GTM Tag Template on our Github. If you have any questions, you can always chat with us at team@keen.io.